|
For most kids, deciding what to wear for Halloween is an exciting time to make a yearly memory. This is no different for my own daughter. However, this year, she received her costume from a neighbor as a hand-me-down. The joy on her face was priceless! Now that she had her costume, it was my job as her father and photographer to make her look epic. The outfit reminded me of an Adorama TV feature that Gave Hoey did years ago that also included the character of Red Riding Hood: As I wanted to use this video as inspiration, but not copy, I choose not to simply review this photo rather than the entire video. This allowed me to make it my own style and look. In keeping with the season of yummy treats, I thought I would write this article in the style of a recipe. Enjoy! IngredientsBeing a portrait photographer I had all the items I needed for this shoot. Which include: Body: Canon 5D Mark III LocationLiving in the city, a nearby forest was hard come by. What I did have though was a city park with a line of trees rich in autumn. The shoot began 30 minutes before civil twilight which helped give a soft glow to the trees in the background. The ambient light was a bit bright when I opened up the lens completely so I used a 6 stop Neutral Density (ND) to compensate. Oven SettingsI realize settings are dependent on the conditions and therefore will not apply to all circumstances, but you can use them as a guide. After all, you don’t want to over-cook your treat! ISO: 100
Tip: As long as your ambient exposure is 1 to 3 stops underexposed and you compensate with flash power, you should be able to get the desired look. It’s really that simple!
PresentationHonestly, I don’t watch a bunch of cooking shows, but I do know a great portrait has good composition. As you can see from one image above, soccer goal posts would have ruined the look. Thus, I placed my daughter in a line of trees that would give the viewer a sense that Little Red was in the woods off to grandmother’s house. My daughter, who loves posing and play acting took over and began to have fun. For a little extra flare my wife through some leaves into the shot.
Final TouchesI took the RAW images which were mostly complete into LightRoom. I added a pinch of dehaze, a bit of an S in curves and then some highlighting and shadowing to taste. The result Is one very happy and very excited little girl, “Daddy I look magical, I love them thank you!”
I hope this inspires you to go out and have fun. As photographers, we have the opportunity to make a child’s dreams and fantasies come true.
About the author: Christopher Buschelman is a 35-year-old fine art and portrait photographer based in Papillion, Nebraska. The opinions expressed in this article are solely those of the author. You can find more of Buschelman’s work on his website, Instagram, portrait Instagram, and Facebook. from https://petapixel.com/2018/10/31/a-recipe-for-a-little-red-riding-hood-photo-shoot/
0 Comments
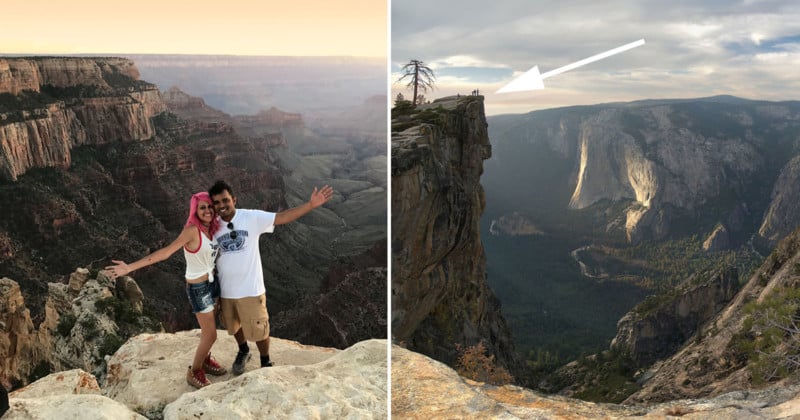
A couple tragically plunged to their deaths while taking a selfie at Yosemite’s Taft Point last week. The accident came just days after an engagement photo captured at the same spot went viral online. 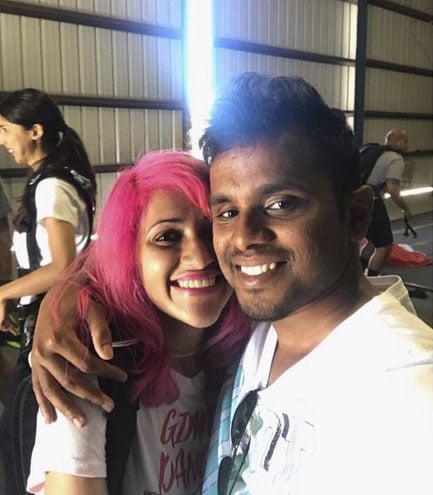 The Associated Press reports that husband and wife Vishnu Viswanath (29) and Meenakshi Moorthy (30) had set-up their tripod at the scenic cliff lookout on October 23rd and were shooting a selfie of themselves when they went over the edge. There are drops at the location of over 1,000 feet (300m). 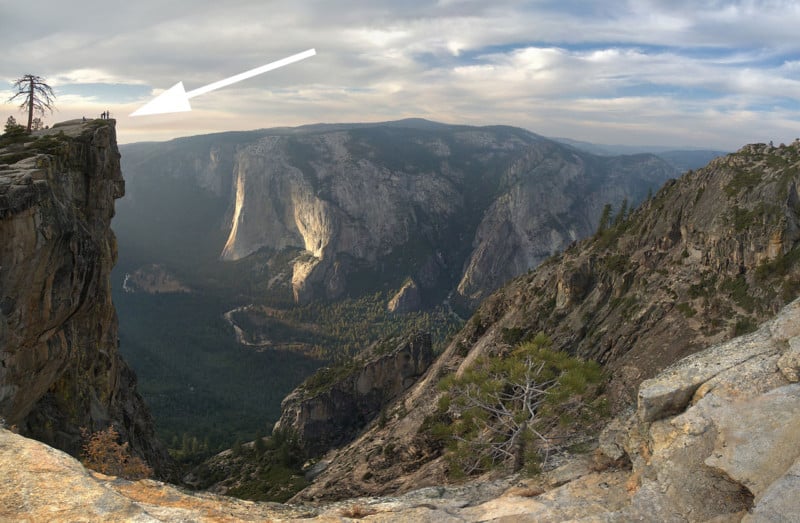 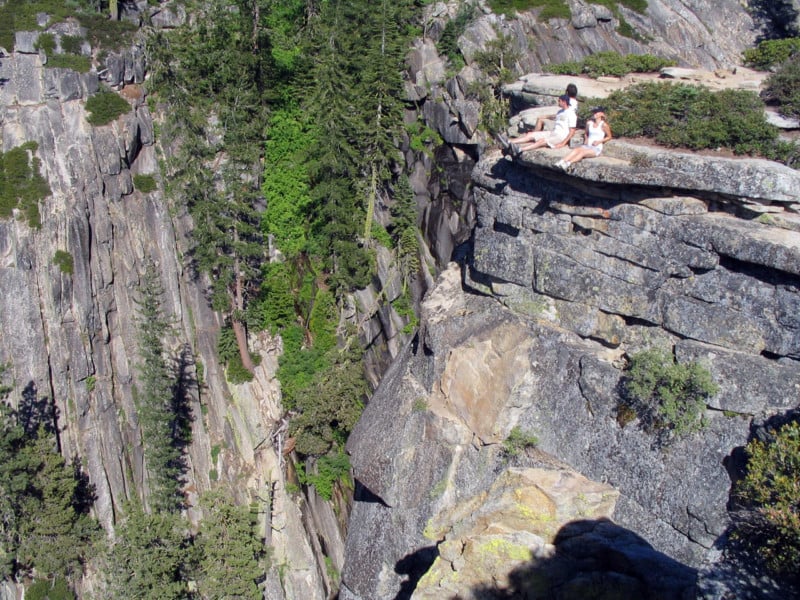 Other visitors discovered the tripod and camera abandoned at the spot the next morning and alerted authorities, who scoured the valley floor from above with high-powered binoculars before spotting the bodies about 800 feet (245m) below. Moorthy was a self-professed “adrenaline junkie†who often posed for death-defying photos from the edge of cliffs with Viswanath, who would post them on their popular social media accounts and travel blog for thousands of followers to see. “Living life on the edge,†Viswanath captioned one photo of himself and Moorthy at the Grand Canyon: 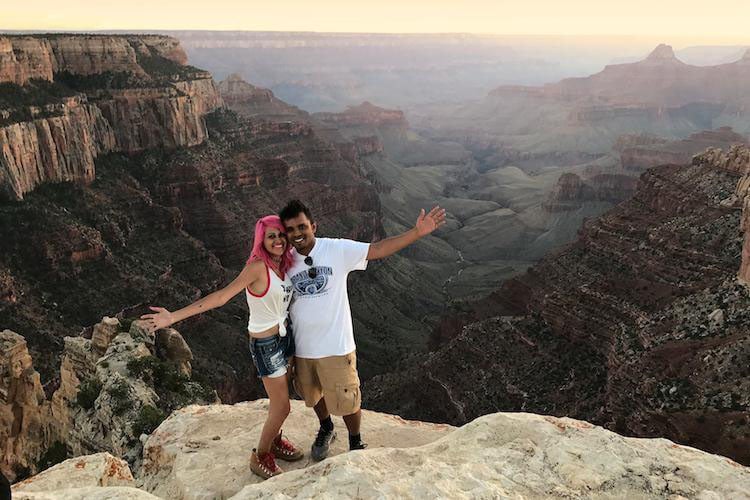 “A lot of us including yours truly is a fan of daredevilry attempts of standing at the edge of cliffs — and skyscrapers,†Moorthy wrote in the caption of a photo of herself at the edge of the Grand Canyon. “But did you know that wind gust can be FATAL??? Is our life just worth one photo?†Another couple who hiked to Taft Point on the same day believes they captured photos of Moorthy just moments prior to her death — a pink-haired woman can be seen in the background of two of Sean Matteson’s selfies. “She was very close to the edge, but it looked like she was enjoying herself,†Matteson tells AP. “She gave me the willies. There aren’t any railings. I was not about to get that close to the edge. But she seemed comfortable. She didn’t seem like she was in distress or anything.†The couple’s death also came just days after an unexpected engagement photo from the same spot became a big news story. Photographer Matthew Dippel was near Taft Point on October 6th when he noticed a man proposing. He managed to capture this photo of the couple: The photo went viral after Dippel appealed for public help in identifying the mystery couple. The mystery was solved within days. A recent study by researchers in India found that there have been at least 259 selfie-related deaths around the world since 2011, and one of the leading causes of selfie death in the world is falling. from https://petapixel.com/2018/10/31/couple-falls-to-death-during-selfie-at-same-yosemite-spot-as-viral-photo/
While cosplay is fascinating in itself, cosplay photography has also been a big part of the craft. In fact, it has long been a popular sub-genre of portrait photography, with a cult culture of its own among comic book, video games, and movie geeks. Today's cosplay photography inspiration is not only a fine example of beautifully done cosplay, but also a stunning cosplay photography project perfect for the Halloween season. If you're a fan of cosplay or do a lot of cosplay photography yourself, we're sure you'll like this one!
from https://www.thephoblographer.com/2018/10/31/corpse-bride-cosplay-photography/
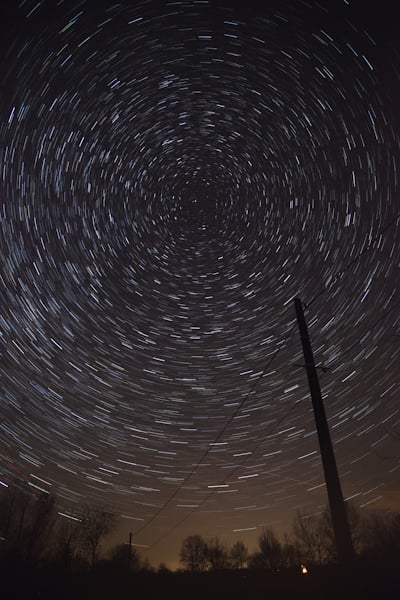
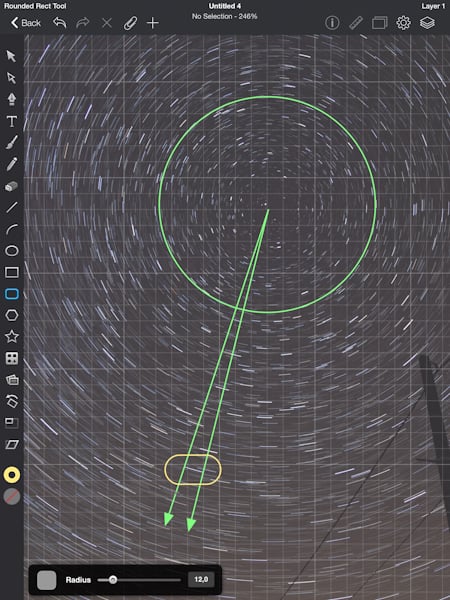
Earth is spinning… and fast! It was during my first nights in astrophotography that it became very concrete for me. By taking pictures of the stars, one quickly obtains a change of star physiognomy that confirms the rotation of the earth. In this article, I describe how to use this phenomenon to measure the rotational speed of the earth with a simple camera. To capture the maximum of light from the sky, the astrophotographer seeks to increase the exposure time to the maximum. By doing this, you quickly find that the appearance of the stars turns into a dash, depending on the focal length it takes few seconds of exposure to have this easily observable. The principle is simple, the stars are very distant celestial objects, they are located at distances expressed in light-years. A light year is the distance traveled by light in one year, and when we remember that the light travels about 186,282mi/300,000km per second, we are quickly dizzy on the distances that this represents. As a result of all this, the stars are so far away that we can consider them fixed in the sky. As we have observed, taking a picture of the sky in very slow pause or taking a succession of several photos of the sky, we clearly see the relative position of the stars change. We have just seen it, we consider the stars fixed in the sky, so their apparent movement characterizes very well the speed of rotation of the earth.
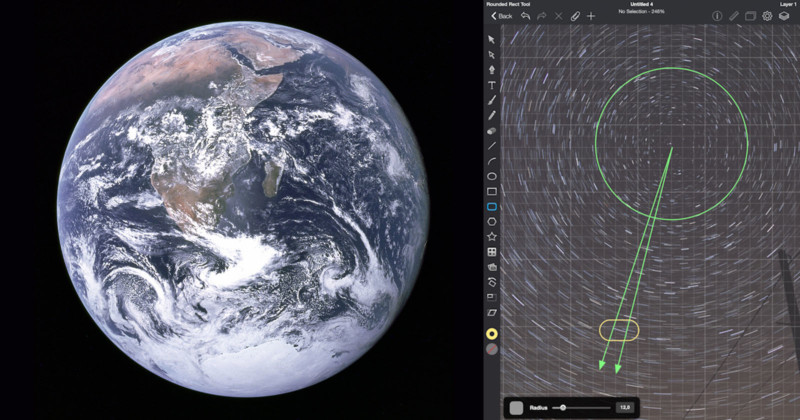
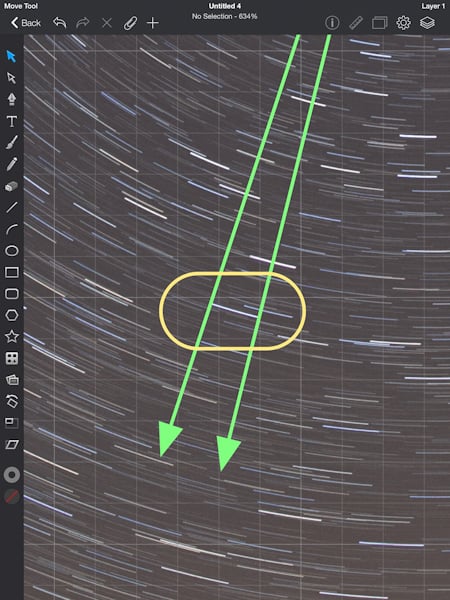
Without going into too much detail, the earth rotates along a North-South axis. In the northern hemisphere, this axis passes approximately through the polar star. Thus, the polar star is fixed and the stars around it trace a circular apparent path around it. That’s what we will measure. By knowing the duration of observation (the duration of exposure of a photo or accumulation of several photos in sequence) and by measuring the angular distance traced by a star, I can easily calculate the speed of rotation of the earth. To facilitate the measurement of the angle, I limit myself to a sequence of a few tens of minutes. As in the previous image, the dashes drawn by the stars are then very apparent. Everyone will have his method and his favorite software, personally, I used an iOS application which has a tool to display the angle of a line. To better locate the polar star, I draw a circle centered on the latter.
The measured angle is 4.1 °, 0.072rad for a duration of 975 seconds. This gives us a rotation speed of 7.33×10⁻⁵ rad/sec. A quick search on the Internet tells us that the precise speed of rotation of the earth is 7.29×10⁻⁵ rad/sec. The difference is less than 1%. ConclusionHere, I showed you how to measure the rotation speed of the earth with an error less than 1% using a simple camera. This result is very interesting, especially since it can be improved by taking more care in measuring the angle. For my part, I am all the more satisfied with the result that the method applies with standard photographic equipment (there’s no need for advanced scientific equipment) and that it allows us to apprehend this scientific truth: the Earth turns, truth otherwise difficult to perceive concretely with our senses. About the author: Panhobby is the photographer behind PhotoPlanet360, a website dedicated to panoramic and 360-degree photos. The opinions expressed in this article are solely those of the author. You can find more of his work on his website, Facebook, Twitter, and Instagram. This article was also published here. from https://petapixel.com/2018/10/31/how-to-use-your-camera-to-calculate-the-speed-of-earths-spin/
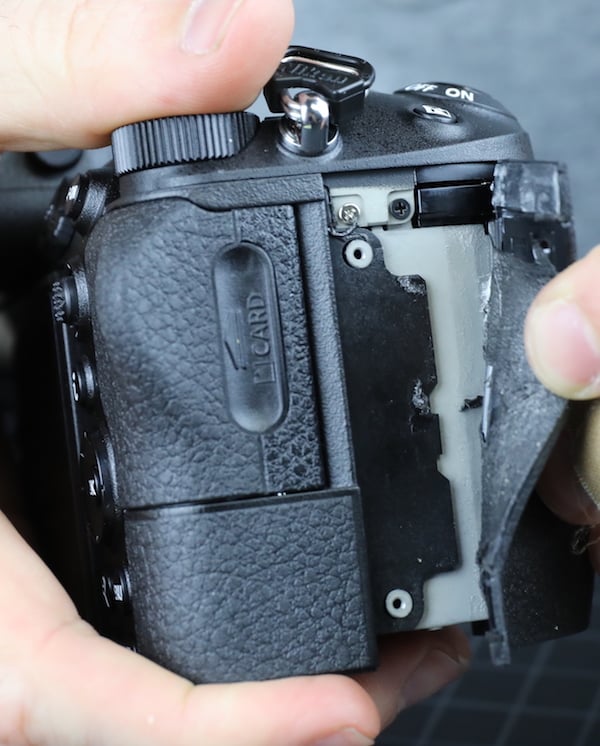
After disassembling a Canon EOS R, Roger Cicala over at LensRentals just did a teardown of the Nikon Z7. What he found was one of the best-built cameras on the market today. You can read Cicala’s full Nikon Z7 teardown article over on the LensRentals blog. We also shared a different teardown of the Z7 by Kolari Vision earlier this month, so be sure to check that one out too if you’re interested in more looks and thoughts on the Z7’s build. The $3,545 Z7 is Nikon’s top of the line full-frame mirrorless camera while the $2,299 EOS R is Canon’s mid-level one — it will be announcing its pro-grade full-frame mirrorless sometime in 2019 — so it’s not quite fair to directly compare the builds of the Z7 and EOS R. But it’s an interesting look, nevertheless.
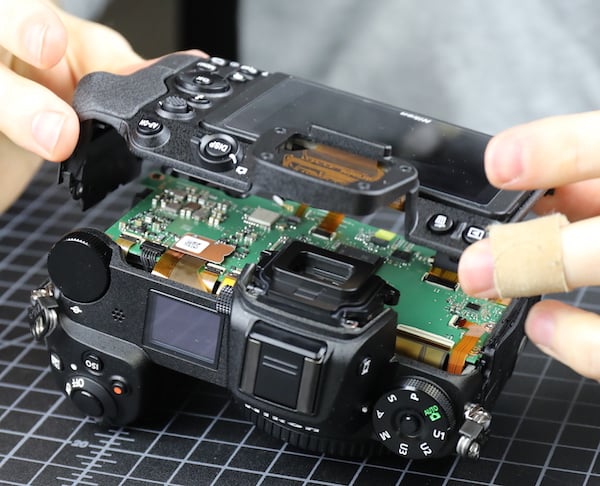
One of Cicala’s main findings in his teardown is that Nikon has ultra-weather-sealed the Z7 — there are weather-resisting gaskets everywhere you look, and finer sealing in certain parts than the EOS R and the Sony a7R III. “In many places the plastic shell doesn’t just interlock; it overlaps, screws together and then is covered with rubber grip and adhesive,” Cicala writes. “That should not only give a superior weather seal, but it’s also probably giving some added strength to the assembly.”
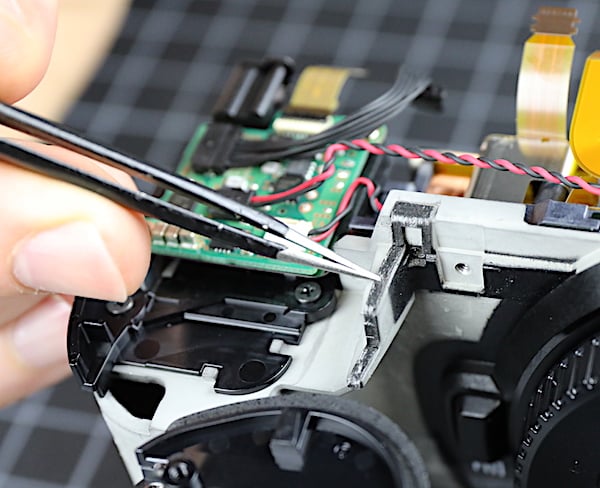
There was similarly great sealing everywhere Cicala looked.
“If there’s an edge, there’s a weather seal,” Cicala says.
“This is not marketing department weather resistance. This is engineering department weather resistance,” Cicala concludes. “[T]his is as robustly weather sealed a camera as we’ve ever disassembled. “I don’t believe in weather resistance myself. I believe like life; water will find a way. I believe in plastic baggies and rubber bands. I am, however, a great believer in the idea that if you claim to do something, then damn well do it right. This is done right. “I’m just here to say this is a damn well-built camera, the best built mirrorless full-frame camera we’ve taken apart.” from https://petapixel.com/2018/10/31/nikon-z7-teardown-the-best-built-mirrorless-full-frame-camera/
For many photographers in the northern hemisphere, the Fall is a favorite time of year to go out and create some photographs. Leaving the sweltering summer heat in the rear view mirror, it's much more comfortable for photographers to be out and about with their gear during the Autumn months without having to worry about sweating through their clothes every five minutes. Autumn also brings about a variety of changes that provide added visual interest for photographers. Once verdant leaves take on hues of golden amber and deep crimson as the warming scents of spices from teas, coffees, and baked goods fill the air. Pedestrians change their wardrobes to adapt to declining temperatures, while decorations for Halloween and Thanksgiving begin to adorn homes and store fronts. As long as you're paying attention, there'll be something of interest for you to photograph.
from https://www.thephoblographer.com/2018/10/31/capturing-the-spirit-of-fall-through-creative-photography/
When I was first told about the Portage Supply Kenora Backpack by my buddy Travis, I went out and bought the 3rd generation backpack off of Amazon at his pointing them out. But after establishing a press relationship with the company, I was told about their 4th generation backpack--and for every day use this has to be one of the best options that isn't a roll top camera bag. The Portage Supply Kenora Backpack has it all: looks, ruggedness, leather, canvas, quick access, and most importantly it's comfortable. In fact, it's the only backpack I've used that doesn't have straps to secure it around your chest that I like. Why? Well, in real life use I realized that the design is in such a way that it doesn't need them. Yes, seriously--it doesn't need them.
from https://www.thephoblographer.com/2018/10/31/camera-bag-review-portage-supply-kenora-backpack-4th-generation/ 
Unlike many guest posts you have read here I am not here to pimp my own images or career. Rather, I am here to push how much money you make on your images, and most importantly the money you can make on photography as a career. Warning: this my contain the least amount of photo information of any guest blog post… but hang in there if you like to be paid for photography. Doesn’t matter if you are in a small city or Los Angeles. Photos are like baseball cards, they are only worth what someone is willing to pay for them. Some may value a Jodie Davis rookie card and some may not – a little trivia there for anyone outside of Chicago alive post 1984. How to put a price on your images is a tricky business that many assume only photo reps and art buyers understand. I have news for you, the value of your imagery is between you and what the client is willing to invest to go to market with the message your images are included in. Now how do you drive at that magical # that a client will pay and you as a photographer will accept? That is the million dollar question… or sometimes the $2,500 question. Getting to the answer starts with you as the photographer asking informed questions of your potential client. The first questions to ask follow this format: who, what, where and how long. Who? What? More and more clients are asking for unlimited use in all media in perpetuity. This tells you one of three things:
It is your job to find out which of the three it is. Often times you can get to that answer by suggesting in the initial reach out that you can quote for unlimited use in all media in perpetuity (often known as a buyout, complete buyout or all rights), but that usually is too expensive for a client’s budget. As a solution you can quote for more limited usage rights that include a time period and more specific media so the bottom line will be more approachable. This is when the client’s request goes from being vague to giving you a better grasp of their intentions. If you are not familiar with the usage terms I started this section with, it would be to your advantage to become versed in them stat so you know what you are talking about. Where? For instance, the images below were licensed for 7 countries specifically. Wieden + Kennedy, the advertising agency, and EA Sports, the client, knew that the imagery would appear in only 7 countries and would tailor the colors and text to each country the ads would appear. This is a case of an agency and client knowing specifics regarding their media buy. Hats off to their strategy department prior to calling a photographer. But these are the things you are sniffing out before giving a quote. This saved them money by not asking for worldwide usage and got specific. 

How Long? Entertainment photography for a movie poster will always be a complete buyout as that image will always be associated with that movie or project. For instance, my work for HBO’s Hard Knocks falls under this situation. The client knows that it will appear in billboards, in print, digital and on HBO GO, which may keep that program available forever. We price the image on the front end understanding that I will never receive any renewal license for the work. 


With these four questions, you will have enough working information to then assemble the usage and licensing to put in a bid. It is also helpful to gauge your usage fees in relationship to your creative fee/day rate to shoot. It is difficult for a client to understand you charging $25,000 usage if your day rate is only $750. You my think you are not “big time” enough to license your work and simply include usage in your day rate. I only say you are selling yourself short. You as a photographer are only worth as much as you are willing to convince your client to pay you. If you feel your days work is worth $85 then that is what you worth. It is your confidence based on information that will dictate your fee and usage $$$ regardless of the market you are in. For example ask Gregg Shipman, photographer from Tulsa, OK. He purchased my tutorial Making Real Money: The Business of Commercial Photography, and after watching the tutorial, he increased his a bid for a local client by $26,000 from where he was going to bid prior to heeding advice from the tutorial. If you think you are operating in too small of a market for this information to help you, then you have never been to Tulsa. Monte Isom is a sports and entertainment photographer based in NYC who loves to share information about the business of photography. He offers a 14-hour video tutorial covering in-depth and with real life examples of estimating, invoicing, marketing your work, and even taxes. Isom interviews people who actually hire photographers and gets extremely valuable information working photographers need. This tutorial can be purchased here. Monte’s photography can be viewed at MonteIsom.com, and you can keep up with him on Instagram and Twitter. The post Guest Blog: Sports and Entertainment Photographer Monte Isom appeared first on Scott Kelby's Photoshop Insider. from https://scottkelby.com/guest-blog-sports-and-entertainment-photographer-monte-isom/
Julie Hrudova is a photographer and photo editor whose work in street photography has garnered her distinctions from award-giving bodies in the industry, as well as spots in many shows internationally. Her photographs are often unexpected – quirky and sometimes surreal, even.
from https://www.thephoblographer.com/2018/10/31/julie-hrudova-streetrepeat-street-photography/
For years the bathtub shoot has been a fantastical and magical idea for many photographers. Those of us who draw our ideas from cinema, the bathtub can come from lots of 90s movies including those like American Beauty. Then there were those of Marilyn Monroe amongst others. Doing these shoots of course requires planning, ideas, work, and figuring out things like spaces available. To me, these style of shoots are mostly a result of my restless mind and my endless urge to create something and improve my portraiture skills. Like a fine art series or a short-term project but without an artist's statement or intention. Most of these style of shoots are a collaboration between models, stylists, and myself so everyone has something to add to the shoot.
from https://www.thephoblographer.com/2018/10/31/the-approach-how-to-do-bath-tub-shoots-with-models-nsfw/ |

Paul DeckerHi I Paul Decker,32 years old from Arizona,AZ,USA,working on 3D animation from the last 4 years.Here I am sharing tips about it. Archives
April 2019
Categories |


 RSS Feed
