|
Photographer Stuart Hendricks practices street photography with his Sony a6300. His favorite lens is the Sigma 56mm f1.4, but for a short while he decided to give the Sigma 16mm f1.4 a spin around the streets of Saigon (Ho Chi Minh City) in Vietnam. Join us after the break for his latest video, and to see what he had to say about shooting street photography with such a wide lens.
from https://www.thephoblographer.com/2019/03/31/check-out-this-street-photography-with-the-sigma-16mm-f1-4/
0 Comments
Photographing portraits using natural light as the sole light source have become such a rage lately that some photographers have branded themselves as "Natural Light Only Photographers." While you can certainly create some stunning images with the proper use of only natural light, understanding how light behaves and being able to harness light in all of its forms, natural or otherwise, will help shape you into a better, more complete photographer.
from https://www.thephoblographer.com/2019/03/30/an-introduction-to-shooting-portraits-in-natural-light/
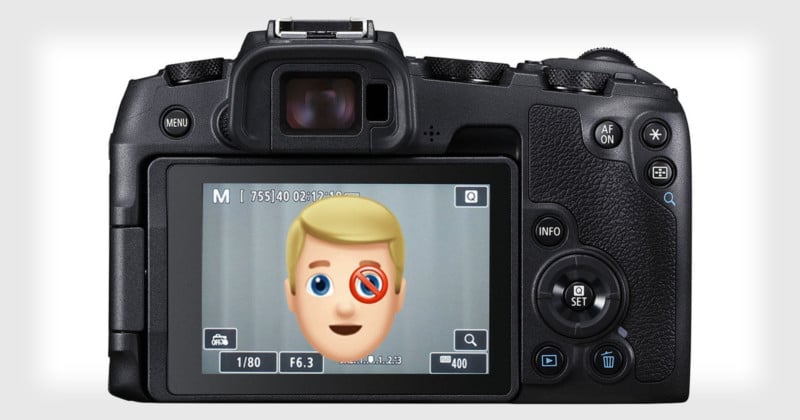
I am an experienced corporate/commercial photographer, and I’ve written this article to help guide my clients into how to prepare for a headshot or portrait session. Most people don’t like having their photograph taken, they find it awkward or can’t stop thinking about one of their perceived weaknesses. This guide should help reduce some of that stress and explain the process a bit more. I think this article will also be very useful for newer corporate photographers, or simply to fill in any knowledge gaps. Even if you’re a landscape or a macro photographer, at some point in your career you’re probably going to be asked to take some pictures of people. I believe a great portrait can be made or lost in the posing of the subject. People first, lighting and camera settings second. The article for clients is below. We’ve compiled our top tips to help you look your best in your headshot or corporate portrait. Whether this photo will be displayed on your company website, set as your LinkedIn profile picture or attached to your name badge, we want you to be proud to show it off. Lots of new people will see this picture before they meet you, so make sure your first impression counts. Using the advice below and very little effort, you can ensure that the first impression is that of a well-presented, approachable professional. Tip #1. Get a good sleep the night beforeWe know it’s tempting to stay at the networking event for one more drink. Or to watch just one more episode on Netflix. We all know that getting an extra hour or 2 will make a considerable difference the following day. If you’re feeling relaxed and positive, you’ll look that way for the photo session. This will also help reduce bags under your eyes and generally make you look more radiant. Tip #2. What to wearPeople can be unsure of what to wear for a professional photo shoot. We always suggest wearing what you usually would when meeting a potential client. Even though a headshot is just head and shoulders, wearing an un-ironed shirt, or a scruffy t-shirt will show in the photo. If you usually wear glasses, decide whether you’d like to wear them in your portrait. If you aren’t going to wear them, or aren’t sure, take them off around 15 minutes before. This will allow enough time for the red marks on your nose to disappear. If you wear makeup, don’t be tempted to over apply. This should be a fairly natural representation of yourself. If you usually choose a bold color lipstick, go for it! Our advice would be to generally stay away from trends, be it fashion choices or hairstyles. The headshot or portrait should last you at least two years. Nothing will date it faster than wearing something that was in fashion for a single season. Tip #3. How to posePlace your body at a 45º angle to the camera and head turned back towards the photographer. Don’t worry if this doesn’t make much sense now, a professional headshot photographer will be able to guide you through this during the shoot. Keep your back straight. Imagine a physio is taking the picture. A poor posture could evoke a lack of confidence. Through a lens, the way you hold yourself reflects how confident you look, so stand tall and be self-assured. See Amy Cuddy’s TED talk on this topic, “Your body language may shape who you are”: Let your hands drop by your sides or place them in your pockets. Not doing anything with your hands may feel odd at the time, but it looks much stranger on camera when someone is holding their hands behind their back. Your photographer will guide you in this area, especially if the picture is a portrait and will include your hands or whole body. Pushing your chin out slightly will separate your face from your neck and body, and define your jawline. To get this right, imagine you’re holding a grapefruit between your chin and chest. Your photographer may ask you to lift your chin or head up slightly, this isn’t because you have a double chin, it’s to ensure the light is hitting your face in the right places. Tip #4. Work with your best sideLots of people are aware of having a ‘best side’. This can be due to the shape or symmetry of their face, or even trying to hide a perceived imperfection. Don’t be embarrassed to tell your photographer this, they will work with you to get the best results. Everyone, in fact, has one eye bigger than the other. By turning your body and head to a 45º angle, placing your bigger eye furthest away will help even out the size difference. It’s not always easy to tell when looking at yourself or someone else, so for most of our clients, we shoot both angles so our clients can choose later on. Tip #5. Look in a mirrorRehearse your facial expressions. Everyone prefers the way they look with a certain expression. A full or half smile could work well for a young and passionate entrepreneur. Alternatively, a CEO or a board member in a professional industry may feel that a neutral expression communicates strength. When posing, try squinting your eyes very slightly. Some photographers call it a ‘squinch’. This can help you remember it on the day. A mix between a squint and a pinch. When someone feels uncomfortable having their photo taken they can react with unnaturally wide eyes. Think of a deer in headlights, that’s what we’re trying to avoid. The video below by portrait photographer Peter Hurley explains this technique perfectly. Don’t be afraid to try different poses, and smile. There’s no harm in trying a few different expressions with the photographer so you can choose which you prefer afterward. To bring out a real smile and avoid looking forced or still in your business portrait, try thinking of something or someone funny. The real emotion will not only help with your smile but also show in your eyes. Tip #6. RelaxRelax and let the photographer lead the conversation. Most people feel at least a little awkward having their photo taken. A true professional portrait photographer will talk to you and build rapport to ensure that you’re relaxed so they can capture you at your best. Be aware of how much you are talking. If the photographer cracks a joke to make you smile and you’ve already got your mouth wide open replying, it may make it difficult to achieve great results. We hope these tips help you when posing for headshots. If you liked the article please share it online, or with a friend or colleague. If you have any other tips you think should be added, please leave us a comment below. P.S. If you are looking for an experienced photographer we would be more than happy to help. We are based in Manchester but travel all over the UK for our clients. Feel free to get in touch for a no-obligation quote. About the author: Decoy Media is a team of professional photographers based in Manchester, UK, but available internationally. The opinions expressed in this article are solely those of the author. You can find more of their work and writing on their website, blog, Facebook, Twitter, and Instagram. This article was also published here. from https://petapixel.com/2019/03/30/6-headshot-tips-advice-to-give-your-clients-for-a-portrait-shoot/ Canadian landscape photographer David Wilder has a type of colorblindness that makes it difficult to tell certain colors apart. He recently got his hands on a pair of special glasses designed for colorblind people, and he shot this 7-minute video that captured his reaction to seeing in full color for the first time in his life. It all began back in January 2019 when Wilder wrote an article over at Fstoppers about what it’s like to work as a colorblind photographer. Of the three main types of colorblindness (Protanopia, Deuteranopia, and Tritanopia), Wilder’s Deuteranopia is a red-green colorblindness in which his eyes are insensitive to green and too sensitive to yellows, oranges, and reds. As a result, some colors (greens, yellows, oranges, reds, and browns) look the same while others (blues/purples and pinks/grays) are difficult to tell apart. After his article was published, Wilder was contacted by EnChroma, a well-known company that produces color blind correction glasses. EnChroma sent Wilder two pairs of glasses (which cost around $270 to $430 each), and Wilder waited until going on a photography trip to Iceland before trying them for the first time. When a fiery sunset filled the sky with vibrant colors, Wilder pulled out the glasses and put them on. The video above is what happened next.  “Instantly, I was at a loss for words, frozen in place at what I was seeing,†Wilder writes at Fstoppers. “Right away, I saw the orange hues explode across the sky, then I started to see the rich pink that I had never seen before. Finally, I turned around and saw the deep purple and soft pink in the opposite side of the sky. “I couldn’t help but think that this wasn’t real. I felt like there was no way I had been missing this much color all my life.†“Let’s just say the glasses became really foggy from extra moisture in the air, or maybe it was from my eyes,†Wilder writes. “I can’t remember.†from https://petapixel.com/2019/03/30/watch-a-colorblind-landscape-photog-see-in-full-color-for-the-first-time/ Just as much of daily life is geared towards right-handed people, cameras are often geared toward right-eyed people. Photographer Michael Andrew (AKA Michael the Maven) made this 4-minute video pointing out Canon’s “left eye problem” in its latest mirrorless cameras. Andrew focuses on the design, UI, and ergonomics of the new Canon EOS RP. Canon has taken away the joystick and has moved the selection of focus points to the touchscreen — photographers can select where they’d like to focus by touching the rear touchscreen while looking through the electronic viewfinder. The problem, however, is that left-eyed shooters will have their noses covering up the right side of the touchscreen, blocking it from being accessed with the right thumb. Focus selection can be moved to the left side of the touchscreen, but then the user is forced to choose between supporting their lens with the left or using their left thumb to touch the screen. There’s an alternative — customizing the directional pad for AF selection — but the ergonomics of that isn’t great either. In a poll he conducted among his audience, Andrew found that over 1/3 of respondents are left-eye shooters, so this is a usability issue that affects a significant percentage of photographers.
“If you’re changing your focusing squares around a lot, it’s almost a dealbreaker,” Andrew says. “I just want to make Canon and left-eyed users aware: we need a joystick. You should do a cost-benefit analysis of having that joystick in the natural resting thumb position so left-eyed shooters can have an option to move those around.” Aside from this “left eye problem,” however, Andrew says he really likes the EOS RP overall and considers it a great camera. (via Michael the Maven via Shutterbug) from https://petapixel.com/2019/03/30/canons-left-eye-problem-is-frustrating-users-with-mirrorless-camera-design/ German timelapse photographer Martin Heck of Timestorm Films released this gorgeous 6-minute short film that showcases the beauty of the southern lights (AKA aurora australis) over the South Pole. “The South Pole is one of the coldest, driest and harshest places on earth,” Heck writes. “The Aurora Australis can be seen together with the core of the Milky Way only here in Antarctica.” Robert Schwarz, the CMB-Observatory (Cosmic Microwave Background) operator and technician at the Amundsen–Scott South Pole Station, shot the photos using Canon 6D and 5D Mark III DSLRs. He braved nighttime temperatures of -70°C/-95°F, and special equipment had to be built to keep the cameras running for the long hours of shooting. Heck handled the post-production in Adobe Lightroom, After Effects, DaVinci Resolve, and LRTimelapse. You can find more of Heck’s work on his website, Facebook, Twitter, and Instagram. (via Martin Heck via Laughing Squid) from https://petapixel.com/2019/03/30/a-timelapse-of-the-aurora-australis-and-milky-way-over-the-south-pole/
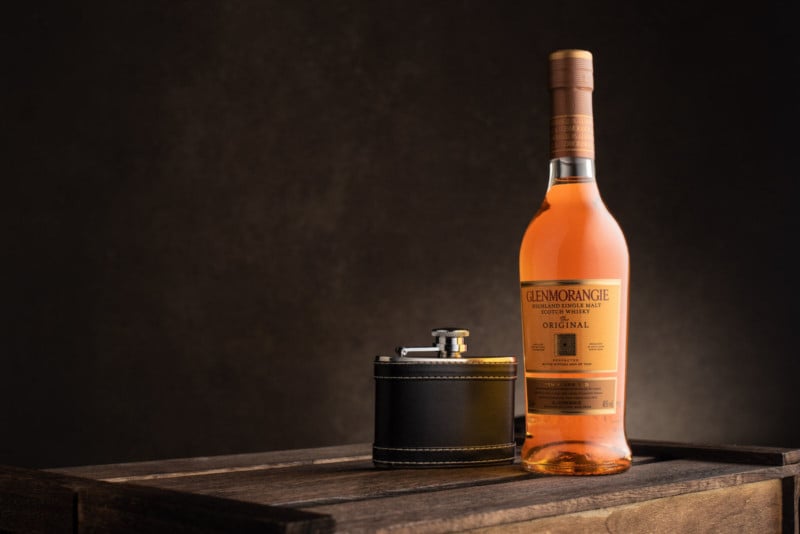
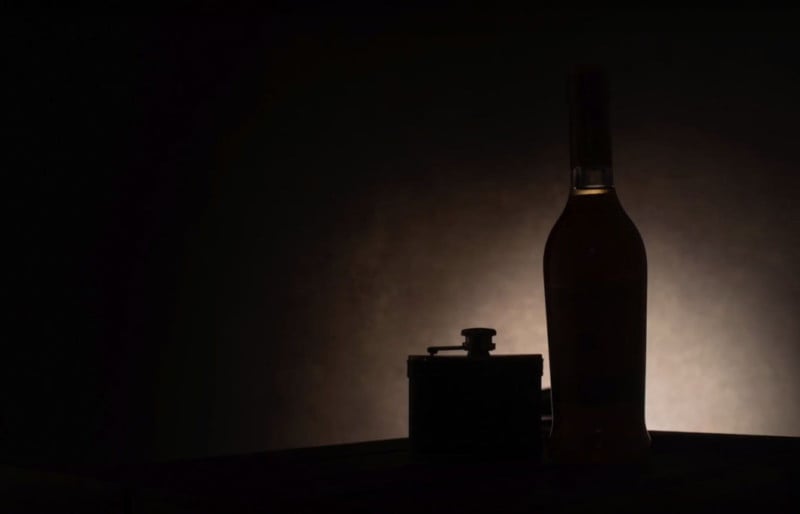
This article is for all of the new photographers new to lighting and to all who think they are limited by their lack of gear! I will show you how you can create this whiskey image with just one light, in-camera, and with no editing. Here’s the video version of this tutorial and walkthrough: Most of this image is in the setup, and by that, I mean shooting at a nice angle for the bottle and hip flask — an angle that is pleasing to the eye. For this shot, I had the camera low and pointing slightly upwards to the bottle and flask. I played about with the position of the wooden apple box and settled for this angle. For the background, I used a hand-painted backdrop from Artery Backdrops. It has great texture and colors which suited this scene perfectly but you can use pretty much anything as a background just be mindful it compliments the product your shooting. On to the lighting setup and a little technique I discovered which works great in this scenario. I used the Pixapro Citi 600 in a 90cm Softbox, but don’t be put off if you don’t have the same light — you can use whatever light you have, you only need one. First, using the Softbox to create a nice highlight down the side of the bottle and positioned camera right.
The problem we have is the left-hand side of the bottle is really dark, so we need to add some light to it. But remember: we are only using one light. We do this by adding a white foam board to bounce the light back into that side of the bottle. If you don’t have any foam board, you can use a card or anything that will reflect that light back.
You can see how it has lifted the shadows and produced another highlight down the left side of the bottle. If you don’t like how wide that highlight is, simply adjust the fill card/foam board until you get your preferred look. A couple of things are still wrong with this image, the first being the highlight on the right of the bottle its still too hard. The second is there is too much light falling on to the canvas background. The best way around this would be to move the whole set away from the background but, if like me you are limited for space, we need another way. You could use a flag/gobo placed behind the light and in front of the background to stop the light falling on it, but that would mean more stands in a small space. My workaround is to add a strip box grid to the softbox at the back of the softbox and turning the modifier away from the background slightly (you can see how I have done this in the video).
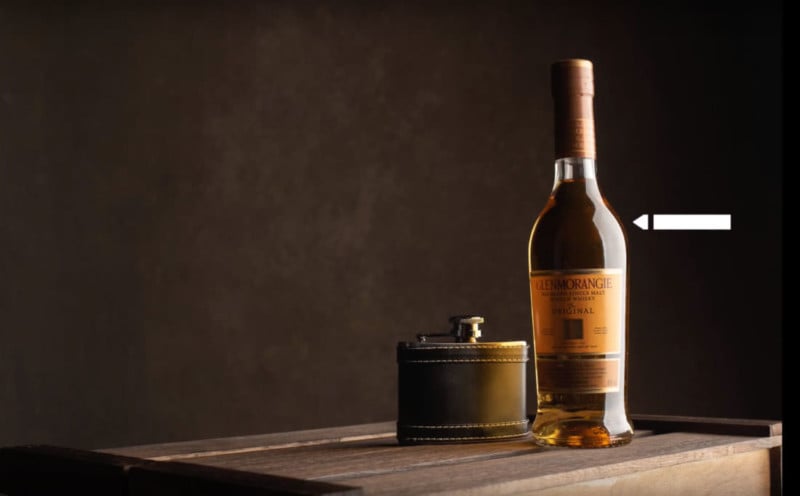
I have the background how I want it. It’s time to work on the highlight down the right-hand side of the bottle. This highlight is too hard even though we are using a softbox that’s placed quite close, we need to soften this more and we do this by adding an inexpensive diffusion panel from a 5 in 1 reflector (if you don’t have one of these a white shower curtain would give a similar effect ). If we position this as close to the bottle as we can so it doesn’t creep into the shot and take another shot.
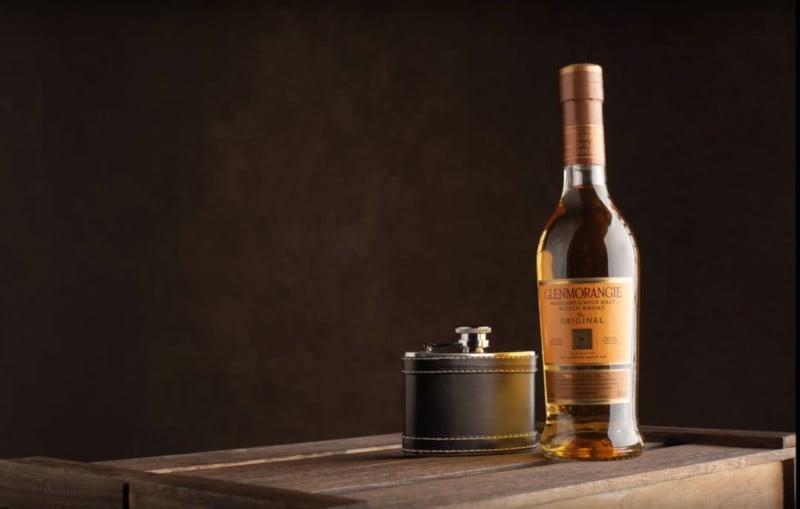
That has produced a really nice soft highlight that looks so much better. I would much prefer to light this with multiple lights it would be so much easier to get everything looking exactly the way I want it but we are sticking with just the one light for the purpose of this tutorial. Next, we need to lift the color of the liquid in the bottle. This is going to make a big difference to the whole look of this set and we do this by adding some colored card cut out in the shape of the bottle, just slightly smaller in size overall, and placed behind the bottle to bounce light and color back through to give this effect:
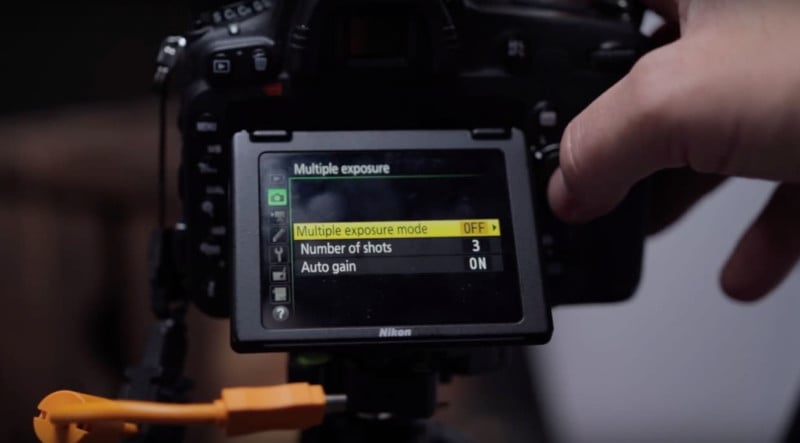
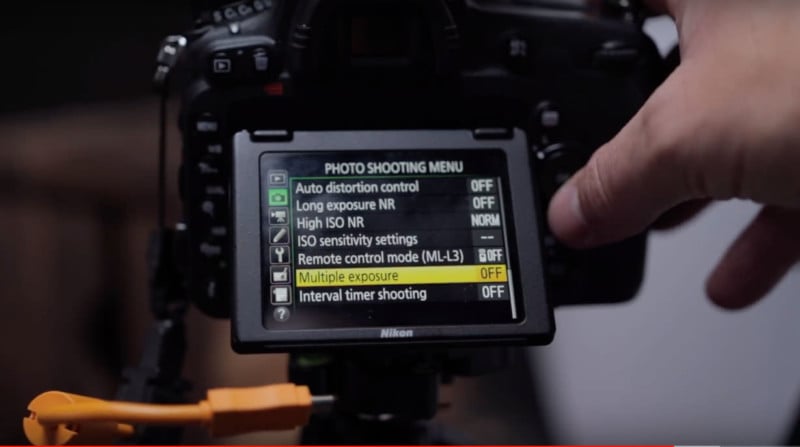
Wow, that really does make a huge difference to the image! Now that we have that looking really good with just one light. I now want a small ball of light on the background just a glow, but how do we do that if I only have one light? Well, this is where the great little technique I discovered and tested out on this image comes into play. You may already be familiar with or know of the multiple exposure technique. I have seen this used many times in portraits where they take a portrait shot almost silhouetted and another image of the sky and clouds and the camera combines it all in camera. This got me thinking — I wanted to try this in a product shot using just one light. To do this we need to set up the camera to shoot two images and combine them in camera. On my Nikon D750, I turn on multiple exposure mode and set the number of shots I need to take, you have a choice of 2-3.
Once this is set on the camera the next step is to take the first shot:
Now what we need to do is remove the light from the softbox and fit it in a standard gridded reflector and place it facing the background just behind the bottle. We take another shot:
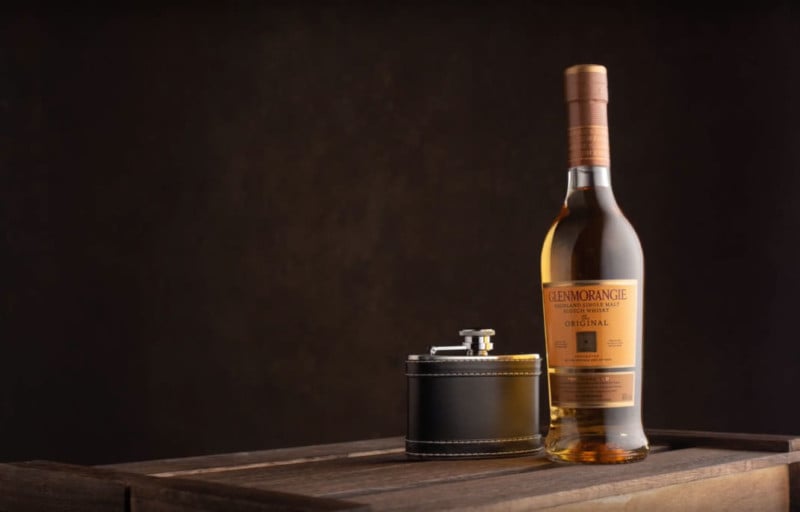
This is the really cool part! The camera now combines the images adding the nice glow on the background area to our first image producing a raw image in-camera!
I was super happy with the results and using this little technique and I hope it gives you a bit of inspiration to give it a go as it is really effective and produces great images with just one light! About the author: Barry Mountford is a photographer based in Gateshead, England. The opinions expressed in this article are solely those of the author. You can find more of Mountford’s work on his website, Facebook, Twitter, and Instagram. This article was also published here. from https://petapixel.com/2019/03/30/the-one-light-whisky-shot/
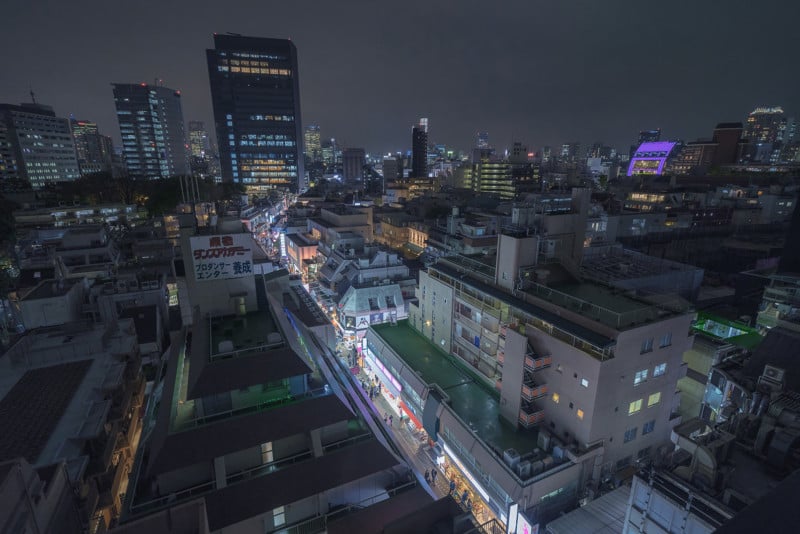
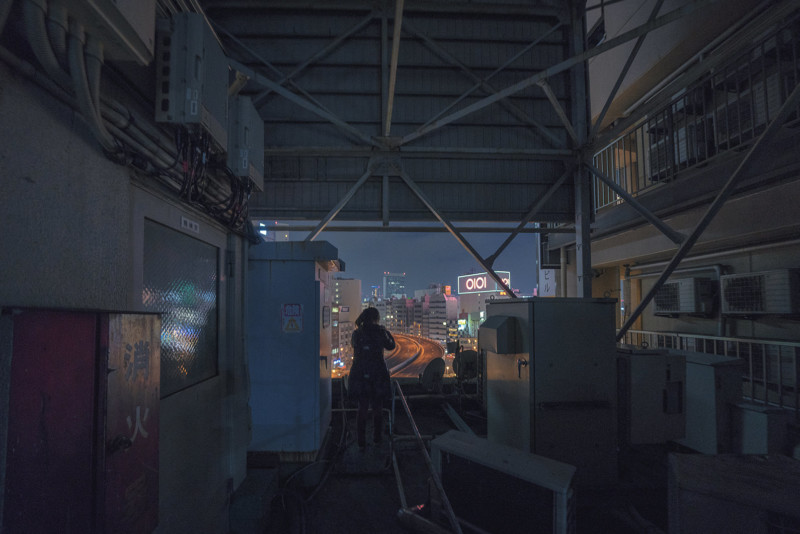
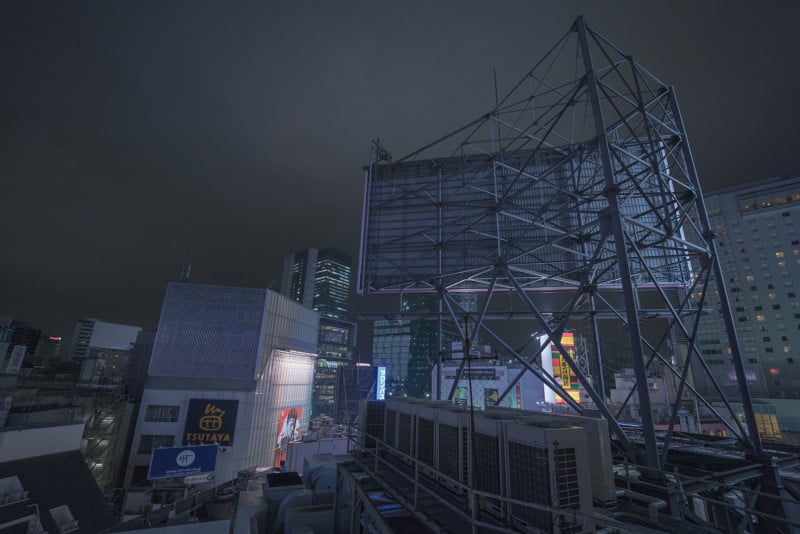
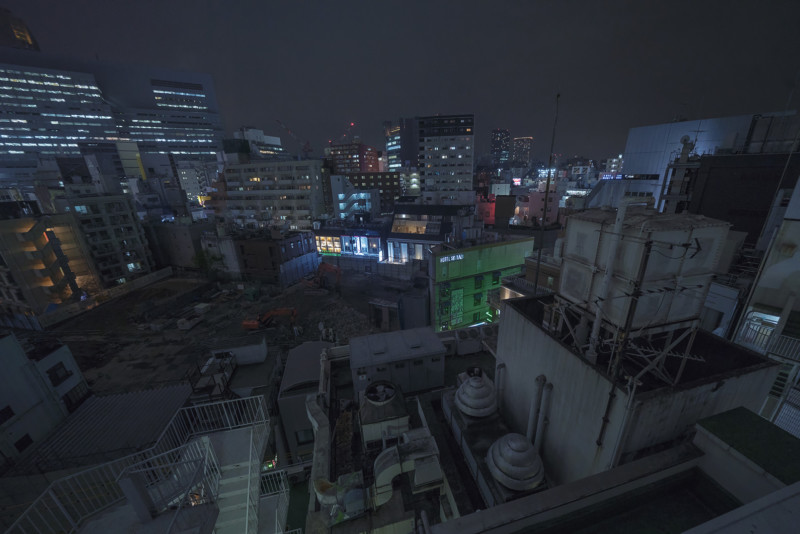
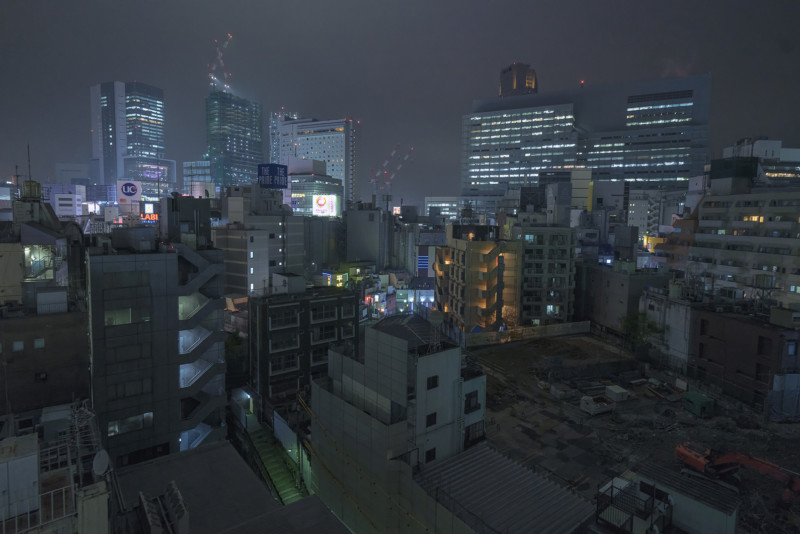
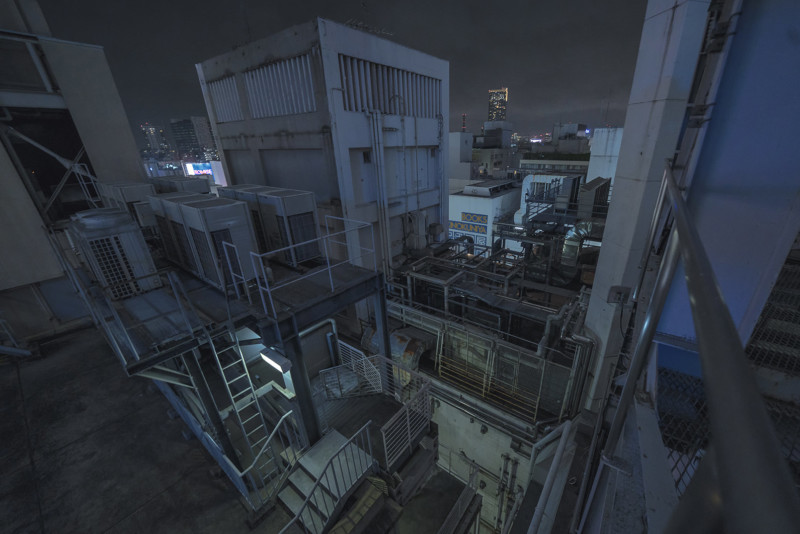
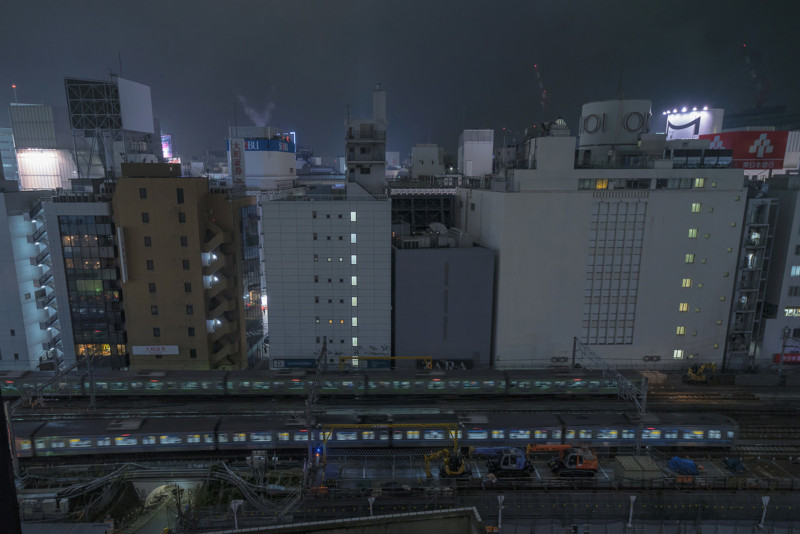
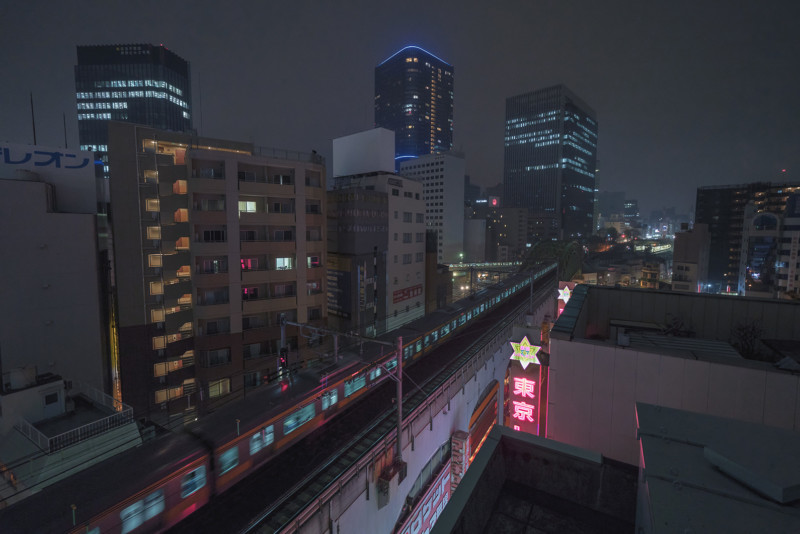
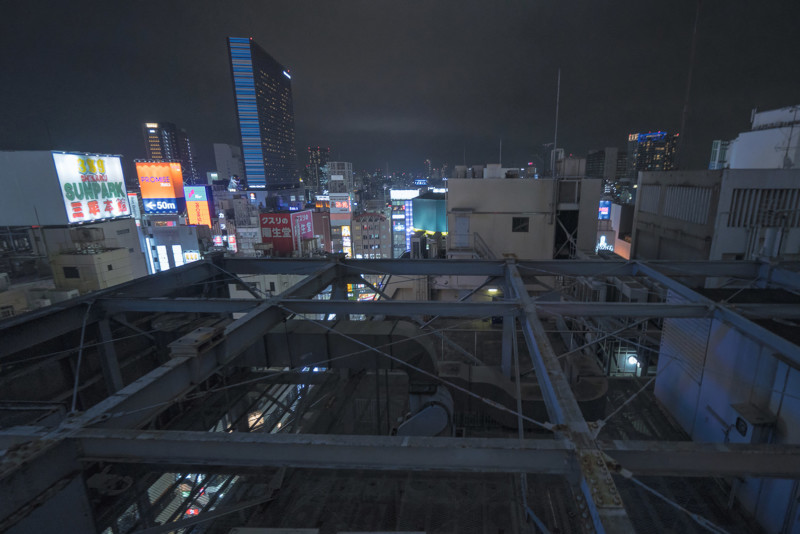
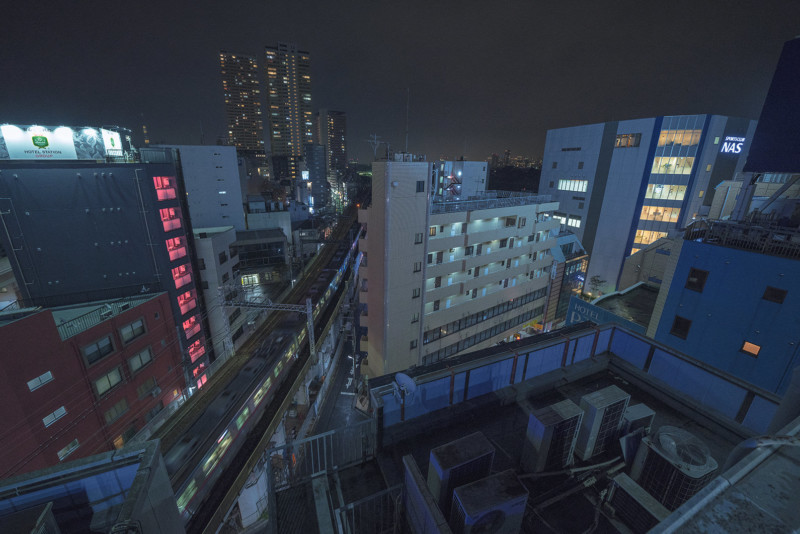
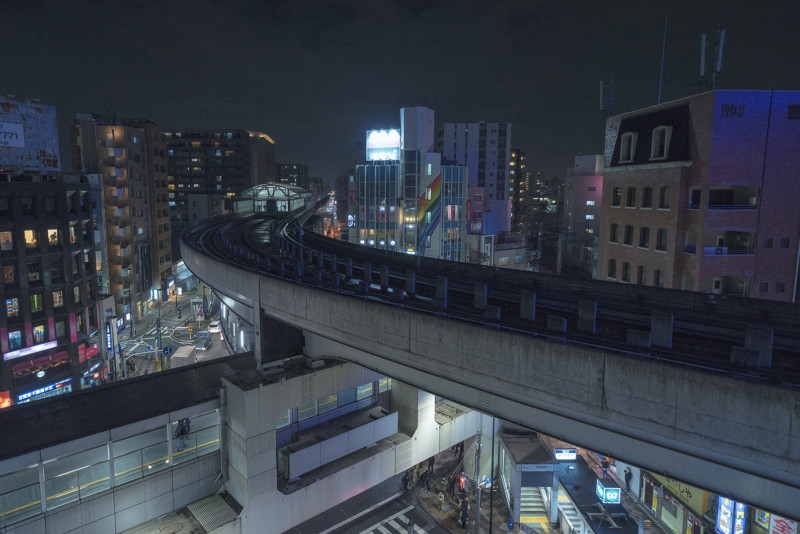
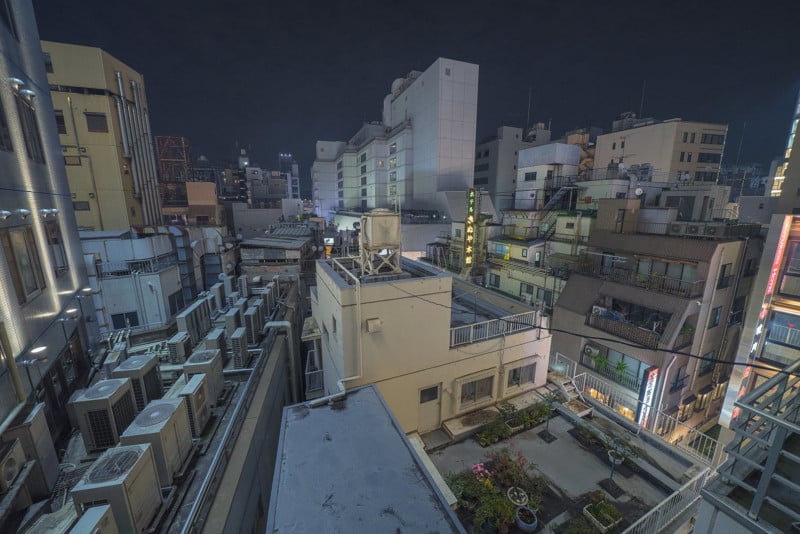
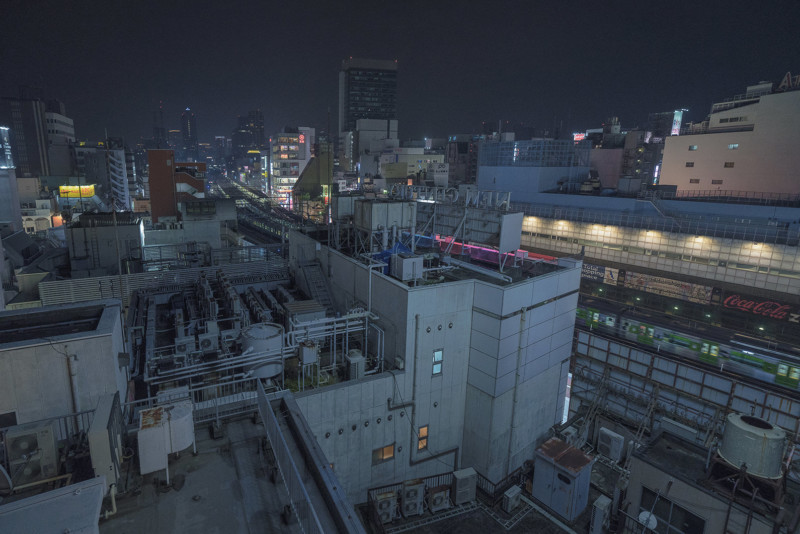
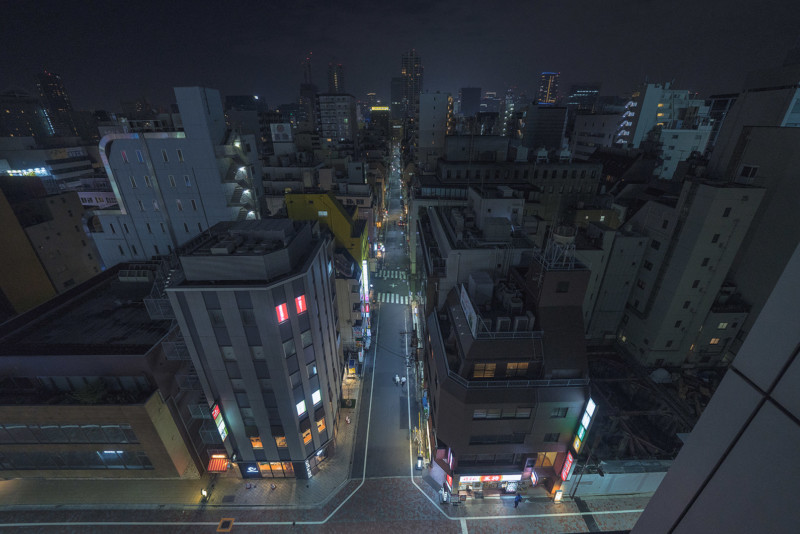
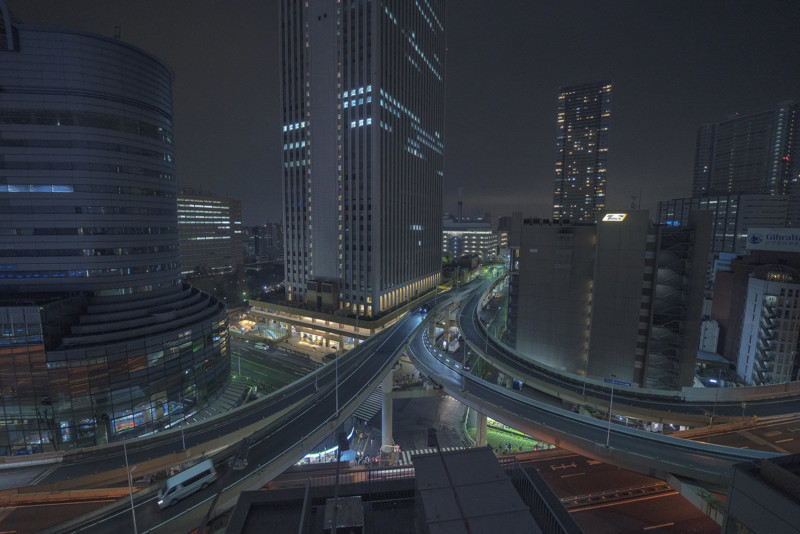
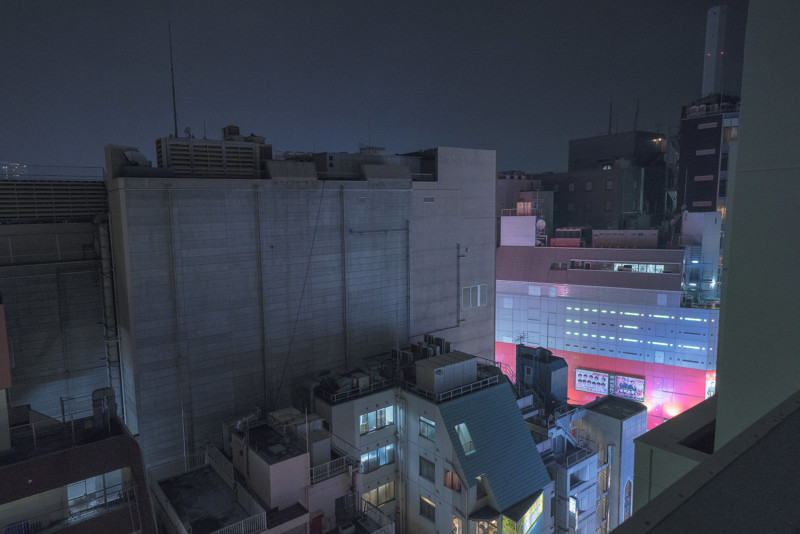
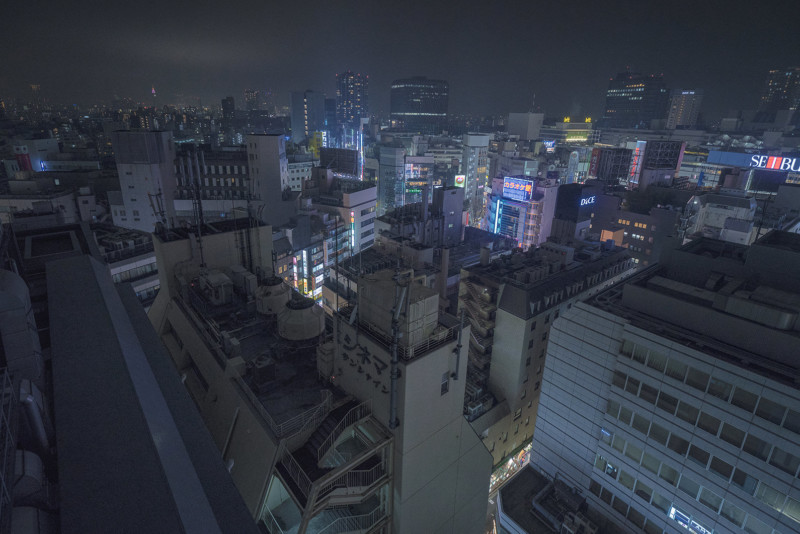
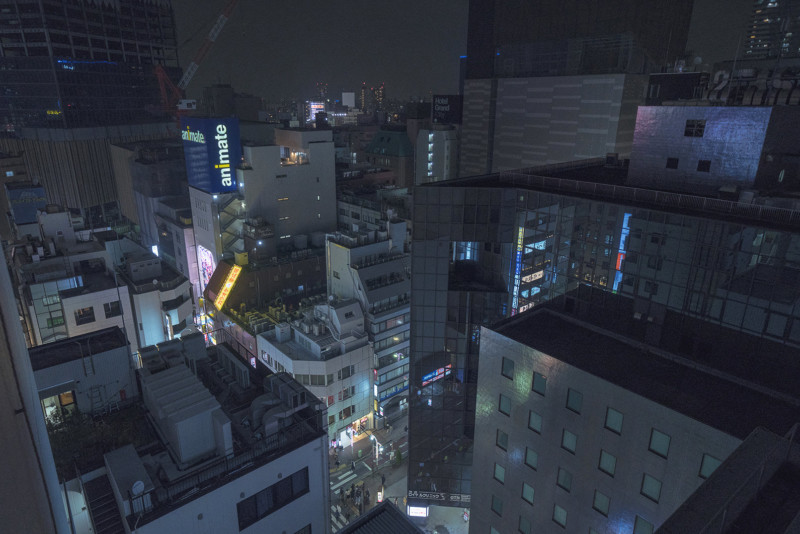
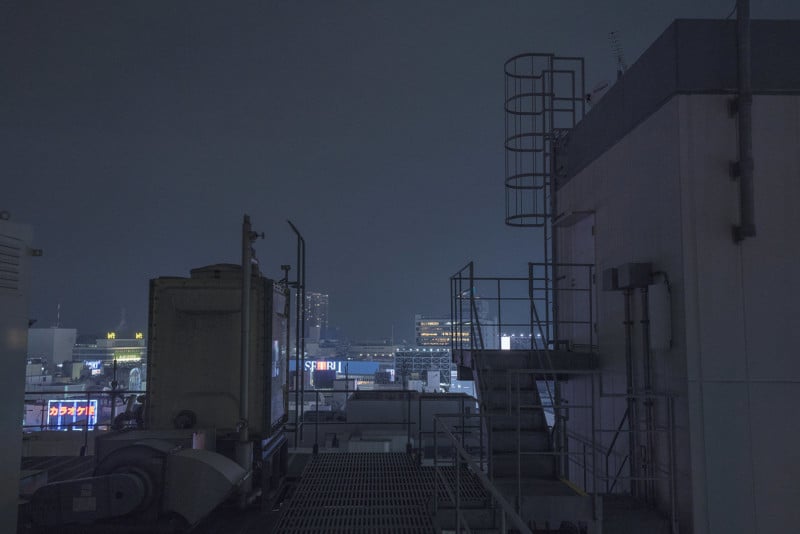
Photographer Austin Hou visited Tokyo a number of times between 2017 and 2018 and spent his nights rooftopping and photographing the city from above.
Here’s what Hou says about the series:
You can find more of Hou’s work on his website. P.S. If you enjoyed these photos, be sure to check out photographer Alain Cornu’s 4×5 large format rooftop photos of Paris at night. from https://petapixel.com/2019/03/30/rooftop-photos-of-tokyo-at-night/
If you have been thinking about buying some new lighting gear, or perhaps a new camera, these photography deals are for you! We have found some great deals on Sony camera bundles like the A6400 bundle with a memory card, case, filter kit, and an extra battery for just $898! There's another similar a6400 kit that comes bundled with a 16-50mm lens too and it is only $998! Need some new lighting? Act fast because the Godox Deals are good for just 48 hours! The Godox AD200 is down to just $269! There are also AD200 bundles that come with the wireless transmitter for each platform for only $310.50. Need a little more power? The AD600 (non ttl) is just $494.10, and the brand new AD 400 Pro TTL is down to only $599! Check out more photography deals after the break.
from https://www.thephoblographer.com/2019/03/30/cheap-photo-save-on-sony0camera-gear-godox-lighting/
Classic cameras always look best in classy chrome or elegant black. If you agree, you may squirm a little in your seat with our latest vintage find: a gorgeous Canon P rangefinder camera that comes in a rather bright and arguable hue. But if you're interested in it anyway, step right up and check out what we've found!
from https://www.thephoblographer.com/2019/03/29/canon-p-rangefinder-shocking-shade-green/ |
Paul DeckerHi I Paul Decker,32 years old from Arizona,AZ,USA,working on 3D animation from the last 4 years.Here I am sharing tips about it. Archives
April 2019
Categories |


 RSS Feed
